Question:
How to prepare sample for western blotting?
The Protein Man Says:
Most experts agree that sample preparation determines the success of the entire Western blotting workflow to a great extent, especially since it sets the foundation for the quality of results that you will get in the end. So, while it is true that the sample can be prepared in a number of ways, depending on the type of material to be used and the type of analysis, the main principle remains basically the same. You need to prepare the sample to make sure that it is in the best possible condition and that the required level of purity is maintained at all times.
In preparing the sample for loading into gels, you need to release the protein(s) of interest from the sample through chemical and/or mechanical means and use protease and/or phosphatase inhibitors to prevent proteolysis, dephosphorylation and the denaturation of the sample. The lysate should then be prepared from the sample of interest and the protein concentration determined before loading it into the gel. So, exactly how do you do it? Here's a simple guide that can help you out.
Choosing a Lysis Buffer
Most starting materials need to be lysed through the use of chemical or mechanical methods to release the protein(s) of interest so that they can migrate individually through a separating gel. This can be done by taking into consideration the type of the sample, the subcellular location of the protein of interest and the required conditions that will allow the antibody to recognize its epitope.
In most cases, however, researchers use chemical lysis buffers to disrupt the cellular membranes and solubilize the target proteins. Some of the most commonly used lysis buffers include Tris-HCl (for soluble cytoplasmic proteins), Tris-Triton (for cytoskeleton-bound cytoplasmic proteins), and NP-40, RIPA buffer and Triton X-100 (for whole cell lysates and nuclear, mitochondrial and membrane-bound proteins). Buffers containing SDS and other ionic detergents are known to be extremely harsh so you can get the highest yield by using these.
However, please note that not all lysis buffers would recognize a protein that has been extracted with denaturing detergents such as SDS and deoxycholate. If your chosen lysis buffer does not recognize denatured proteins, it is best to use buffers that contain mildly ionic detergents or those that do not contain any harsh detergents instead. In such cases, cell lysis is accomplished through mechanical shearing using a Dounce homogenizer or by passing cells through a syringe tip.
Adding Protease and Phosphatase Inhibitors
Once the cells rupture, your sample runs the risk of undergoing proteolysis so you may need to keep your samples on ice or under 4oC at all times. You may also need to add the appropriate protease or phosphatase inhibitor to preserve the integrity of your sample.
Some of the most commonly used protease inhibitors include aprotinin (inhibits the action of trypsin, chymotrypsin and plasmin), EDTA/EGTA (for metalloproteases that require magnesium, manganese and calcium), Leupeptin (for lysosomal proteases), Pepstatin-A (for aspartic proteases) and PMSF (inhibits serine and cysteine). On the other hand, sodium fluoride (inhibits acidic phosphatases), sodium orthovanadate (inhibits tyrosine and alkaline phosphatases), B-glycerophosphate and sodium pyrophosphate (both inhibit serine and threonine phosphatases) are among the most commonly used phosphatase inhibitors.
Preparing the Lysate
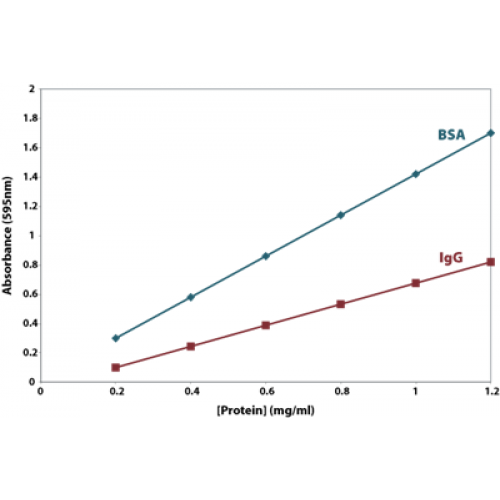
The lysate can be prepared from a cell culture or directly from the tissue of interest. In both cases, ice cold lysis buffer should be added to the starting material before agitating and centrifuging them at 4oC. Cell cultures should be agitated for 30 minutes while tissue samples should be agitated for 2 hours prior to centrifuging them at 12000 rpm for 20 minutes. After preparing the lysate, the protein concentration should then be determined using the Bradford, Lowry or BCA assay. With everything else done, you are now ready to load the lysate into the gel or store it at -20oC or -80oC for future use.
Choice of loading buffer: The final step of sample preparation for western blotting is adding loading buffer to the protein sample and heating or no heating of sample depending upon the type of PAGE. For SDS-PAGE, loading buffer contains SDS, 2-mercaptoethanol, glycerol and bromophenol blue. SDS denature the protein and make them negatively charged, 2-mercaptoethanol or DTT break disulfide bonds and glycerol increases sample density so that proteins settle in the well when loading. Bromophenol blue is added to monitor the run of peptide/protein on gel. Usually for SDS-PAGE, sample is heated with loading buffer before loading on wells.
The loading buffer for native-PAGE does not contain SDS, 2-mercaptoethanol or DTT and sample are not heated with loading buffer before loading on gel.
Image By: ponsulak